Thursday, September 24, 2009

wedding projects

I've been working on a few wedding projects for a wedding we're covering this weekend. For their big altar flower arrangements, I've created two cherry blossom crystal trees. Here are some pictures.
This is the same birdcage card holder used for our wedding
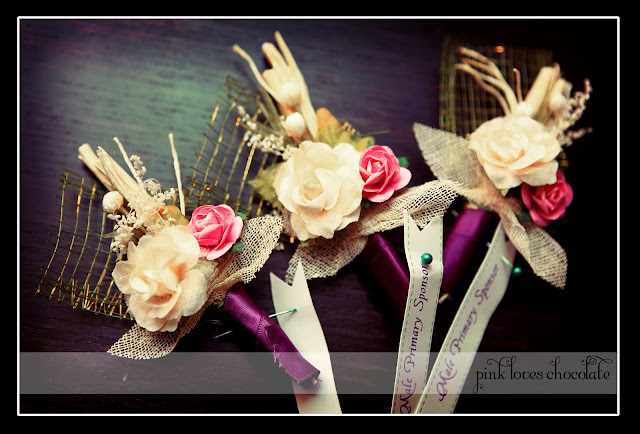
I can't really take credit for these beautiful boutonnieres. On a random stroll to Dollarama, I found these pre-made boutonnieres. All I did to match the bride and groom's theme is add green sinamay ribbons, a green cone thing (I don't really know what that's called haha) which I swiped from my jar of potpourri and wrapped them all in a nice silk purple ribbon. It's amazing what you can achieve with a little bit of wire and double sided tape =)
Again, I added the sinamay ribbon and silk purple ribbon. Don't you just love Dollarama??
Pink paper rose, sinamay ribbon and silk purple ribbon
For the Groom's boutonniere, I added a touch of pink flowery cone, green sinamay ribbon and silk purple ribbon

silliness = love!

I just had to post this picture! This was us on our very first garage sale. Clearly, it was the wrong weekend to do it as everybody was probably away on vacation for labour day weekend. We were getting bored in the sun, we played the guitar and sunbathed in our front yard. It was fun nevertheless. We made $26.00. Enough for a decent meal at Swiss Chalet =)


september updates =)

Okay, I guess this is my attempt to speed update, as we've been incredibly busy the last few weeks. Believe it or not, these pictures were edited just this week, even though they've been collecting dust in my computer since the beginning of the month. I'm uploading all these pictures even if it means I'll be referring you to my facebook page for there will be more pictures to edit after our much anticipated Western Caribbean cruise next week. Here are some pictures of our labour day weekend getaway with the Abats.
Rory enjoying the water by the wave pool
The Abats
A's money shots. Haha
More pictures here
I was so excited planning for Angel's birthday because of this candy buffet! I just hoped I could have taken a better picture before the kids disturbed the glorious arrangement haha. They were sneaking out candy even before I finished putting it all together!
Love the jellyworms!


Here are the kids!
And our sleepy Angel
Her Kuya Adrian helping her blow the candle
More pictures here
Final engagement shots for Judith and Randy before their wedding this weekend.
More pictures here
I'm posting more pictures of Beng and Beejay's wedding. It was soooo much fun even though we both were so stressed out that day =)
This is probably my most favorite shot
And this. Haha.
More pictures here
I also finished laying out their 160 pages wedding book. I'm ordering it through Blurb whose services I've used for our own wedding book. Here's the link showing a 15-page preview of Beejay and Mary Anne's wedding. Friends and families can order the book through this link as well.

Saturday, September 05, 2009

...wake me up when September ends...

I've been so busy editing and going through pictures of last weekend's very last minute wedding gig. We still have two main events before the end of the month and all I can say is, I can't wait till October!

Anyway, here's a sneak peak. I really shouldn't be posting this since I haven't even shown this to the bride and groom but isn't Mary Ann stunning??

Tuesday, August 25, 2009

baby shower cupcakes

Here are some cupcakes I've created for a baby shower.
I love the baby in a peapod!
A closer look =) Chocolate truffle and chocolate peppermint. Yum!


More shower cupcakes

I'm in crazy card making mode so for a limited time, all new cupcake orders will come with a "pink loves chocolate" handmade card!
These are chocolate truffle cupcakes with a surprise cocoa dusted meringue topper.

Thursday, August 20, 2009

the birthday series!

I had a great time making these birthday cards. In the world of computers and advanced technology, it's nice to get a handmade card once in a while. Enjoy!

flat invitation tutorial

Wow. No entry since the 31st! I guess we've been busy with weekend summer activities. The weather has been so nice recently that we've been to the beaches almost every weekend. I've also been working on a few projects for this September and this flat invitation is one of them. This is a simple step-by-step of my latest invitation project. Forgive the crappy unedited photos. I had the light directly above my workstation and I just had enough time to add labels and logos. I guess the pictures showed I apparently also need to get my eyes checked =P
I guess I went one step ahead with my pre-corner punched cardstock in the above picture =P. Anyway, insert your cardstock roughly 90 degrees into your corner punch to create the design. My corner punch allows me to look at where exactly my punched image would go. This of course is just a yummy extra. You don't really need to have nice decorated corners but what the hey!
This is my newest toy, Thank God for 50% coupons from Michaels otherwise this would have been too pricey! I used a different cardstock from what you see in the original finished product but this is just for the purpose of demonstration. With this size of punch I was able to make 25 scalloped squares using a 12x12 patterned cardstock.
Your finished scallop square. How pretty!
Using photoshop or other photo editing software, crop your desired picture into a square and make sure it fits onto your punched scallop square. Believe it or not, I actually printed these pictures through Microsoft Word. It saved me from wasting a whole photo sheet.
Using your glue runner, glue the pictures onto your scallop squares. Cut a length of herringbone ribbon good enough to wrap around your cardstock. The ribbon ends do not have to meet.
Use your glue runner to attach the ribbon onto your cardstock.


Now, place your finished scallop squares with picture to cover the ribbon ends. You can now decide where to put your flower embellishement.
You can use a glue runner to glue on your flowers or for a layered look, use glue dots. Use your glue runner to attach the crystal embellishments.
Tada! Your finished flat invite!
I made these cupcake pops for a girl who's turning 4. I love the light pink candy melts!
Exploring pink loves chocolate packaging options. Every new order now comes with a complimentary pink loves chocolate handmade card.

Thanks August Empress for the cool background!